How to do mountain yoga (photo)
1. Essentials of mountain yoga movements:
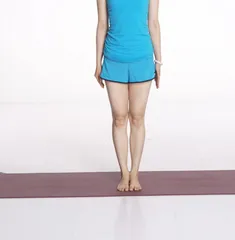
Position your body in the right position, lift your knees and tighten your thighs
Wrong action 1
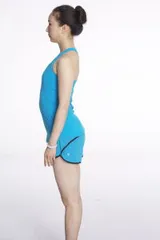
Pelvis forward-waist collapse
Error Action 2:
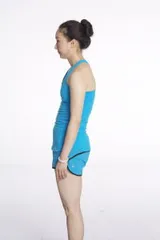
Arch back
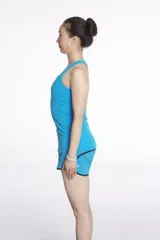
Correct position on the side
1) Keep your feet together, and keep your toes, inside of your feet, and heels together as close as possible. Press the thumbs heel, pinky toe heel and heel evenly against the ground.
2) Face your toes straight forward and spread out your ten fingers evenly. Determine whether the ankle is in the correct position by running the line from the middle of the second and third toes to the center of the ankle. Fold your ankles towards the center, and fold your calves and knees towards the center.
3) Lift the knee joint up and do not lock it backwards hard to avoid hyperextension of the joint.
4) Clamp the inner thigh tightly, and the muscles in all four directions of the thigh will feel tightening and lifting.
5) The abdomen is slightly retracted, the ribs are slightly retracted, the tail vertebra is slightly curled inward, the pelvis is flat and not tilted forward, and the waist is not collapsed.
6) Spread your shoulders to the sides, spreading your chest and back outward at the same time. Relax and lower your shoulders again, away from your ears, with the upper edge of your shoulder blades spreading outward and the lower edge retracting toward the middle.
7) Gently retract the chin around the ears to lengthen the back of the neck. Feel like your face and the back of your head are parallel. Keep your eyes straight forward and maintain the natural curvature of your spine
8) Stretch the arms downward, turn the biceps forward, and the elbow fossa forward. The muscles on the front and back of the upper arm are aware of the contraction force. Fingers should naturally open and take root downward. Do not bend the wrist and there are no skin folds.
9) When viewed from the side of the body, the ears, midline of the shoulder joint, midline of the pelvis and heel are in a straight line.
10) Feel the same flow of energy on the front and back sides of your body.
Benefits: Improve your body shape, especially the shape of the spine, eliminate back pain, and practice with closed eyes can enhance your balance.
Contraindications: Patients with hypotension and hypoglycemia should not maintain this pose for too long, otherwise it may easily cause orthostatic hypotension.
Sort of: The mountain pose is generally used as the first pose to stand, but can also be used as a transition, connection, and rest of the pose. As a rest adjustment exercise, try to choose to separate your feet apart from your pelvis to the width of your pelvis and stand with your eyes closed. It will be easier to maintain balance and allow you to relax better.