Yoga poses: Side and front stretching
This posture is a transitional posture before doing the "inverted triangle pose". It helps improve balance and fully stretch the sides of the body, abdomen and hamstring muscles to prepare for the subsequent "inverted triangle pose." Of course, you can practice this pose independently, which in itself can fully stretch the muscles of your trunk and feet, increase balance, and create beautiful lines for you. Among them, the posture of closing the palms of the back can make the upper back, wrists and elbows more soft, but don't force this action, lest it backfire.
Practice: 网站图片位
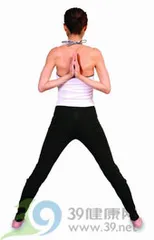
1 starts from the "mountain pose", place your hands back, close your palms inward, and place them between the shoulder blades and in the center of your body. This action of closing the palms is called "namaska". Chest your chest and stomach your abdomen, turn your shoulders back, and put your elbows back.
2 Spread your feet about 3 and a half feet wide, push straight, keep your left and right heels in the same line, and your toes pointing straight forward.网站图片位
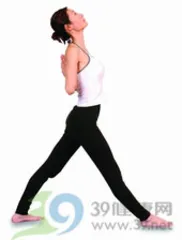
3 Turn your right foot to the right at an angle of 90 degrees, turn your left foot to the right at an angle of 75-80 degrees, and align your right heel with the arch of your left foot. Then turn your entire body to the right, facing the right at the same angle as your right foot, leaving your feet in the same position. Keep your shoulders perpendicular to your pelvis facing forward.网站图片位
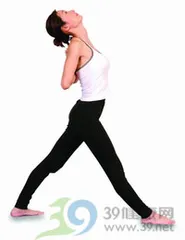
4 Try to straighten and stretch the hamstring of the right foot, tighten the thigh muscles, and support the weight of the body with the heel. Push back on the hamstring of your left foot to maintain balance. Inhale, lift your head, stretch your chest and waist upward, and look up. Keep your palms close to each other behind your back and tilt your trunk back slightly, but don't tilt your neck too far.
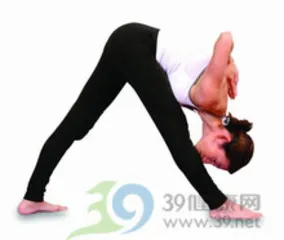
5 Exhale and stretch your spine. Driven by your pelvis, stretch your trunk forward. Start with your abdomen and slowly press on your thighs in front, then your chest, and finally press your chin on your knees. Keep your shoulders and elbows up as far as possible. Keep your feet upright, especially with your hamstring muscles in your rear legs to maintain balance. Breathe naturally. Hold this position for about 20 to 30 seconds, then return to step 1 in reverse order and repeat the above steps with the other foot.
Difficulty adjustment:
* If you can't close your hands behind your back, you can grab each other's elbows instead. * You can also hang a rope on the wall to help you close your palms behind your back:
1 Stand with your back in front of the rope, put your hands on the center of the rope from the outside, and press your palms together with your fingers towards your back.
2 Slowly move forward, and the rope will pull up the palms of your hands with your palms, so that your fingers are facing up your back.
3 Stop your palms between your shoulder blades.
4 Remove your palms slightly from your back, let the rope loose, and complete the palm closing action.
Common mistakes * Your feet are not straightened and your knees are bent, making it impossible to support your body weight. * When the body stretches forward, the head is pressed against the legs before the spine bends, causing the back to be severely bent. No force was exerted backwards on the hamstring muscles of the hind legs.
Benefits:
* Relieve mental tension and make your mind clear. * Relieves joint pain in the neck, shoulders, elbows, wrists, etc. * Exercise your abdominal muscles. * Massage the liver, spleen and digestive organs. * Relieve menstrual pain. * Stretch your feet to make your muscles stronger and create beautiful lines. * Improve balance. * Eliminate waist fat and beautify waist lines.
Notes:
* If you have heart disease or high blood pressure, skip step 4. * If you have diarrhea, please skip Step 5 (Internship Editor: Long Weiquan)